Prerequisites
To use the Angular framework, you should be familiar with the following:
Knowledge of TypeScript is helpful, but not required.
To install Angular on your local system, you need the following:
Node.js
Angular requires a current, active LTS, or maintenance LTS version of Node.js.
For information about specific version requirements, see the
engineskey in the package.json file.For more information on installing Node.js, see nodejs.org. If you are unsure what version of Node.js runs on your system, run
node -vin a terminal window.
npm package manager
Angular, the Angular CLI, and Angular applications depend on npm packages for many features and functions. To download and install npm packages, you need an npm package manager. This guide uses the npm client command line interface, which is installed with
Node.jsby default. To check that you have the npm client installed, runnpm -vin a terminal window.
Install the Angular CLI
You use the Angular CLI to create projects, generate application and library code, and perform a variety of ongoing development tasks such as testing, bundling, and deployment.
To install the Angular CLI, open a terminal window and run the following command:
npm install -g @angular/cliCreate a workspace and initial application
You develop apps in the context of an Angular workspace.
To create a new workspace and initial starter app:
Run the CLI command
ng newand provide the namemy-app, as shown here:ng new my-appThe
ng newcommand prompts you for information about features to include in the initial app. Accept the defaults by pressing the Enter or Return key.
The Angular CLI installs the necessary Angular npm packages and other dependencies. This can take a few minutes.
The CLI creates a new workspace and a simple Welcome app, ready to run.
You also have the option to use Angular’s strict mode, which can help you write better, more maintainable code. For more information, see Strict mode.
Run the application
The Angular CLI includes a server, so that you can build and serve your app locally.
- Navigate to the workspace folder, such as
my-app. - Run the following command:
cd my-app ng serve --openThe ng serve command launches the server, watches your files, and rebuilds the app as you make changes to those files.
The --open (or just -o) option automatically opens your browser to http://localhost:4200/.
Angular concepts
Angular is a platform and framework for building single-page client applications using HTML and TypeScript. Angular is written in TypeScript. It implements core and optional functionality as a set of TypeScript libraries that you import into your apps.
The architecture of an Angular application relies on certain fundamental concepts. The basic building blocks are NgModules, which provide a compilation context for components. NgModules collect related code into functional sets; an Angular app is defined by a set of NgModules. An app always has at least a root module that enables bootstrapping, and typically has many more feature modules.
- Components define views, which are sets of screen elements that Angular can choose among and modify according to your program logic and data.
- Components use services, which provide specific functionality not directly related to views. Service providers can be injected into components as dependencies, making your code modular, reusable, and efficient.
Modules, components and services are classes that use decorators. These decorators mark their type and provide metadata that tells Angular how to use them.
- The metadata for a component class associates it with a template that defines a view. A template combines ordinary HTML with Angular directives and binding markup that allow Angular to modify the HTML before rendering it for display.
- The metadata for a service class provides the information Angular needs to make it available to components through dependency injection (DI).
An app’s components typically define many views, arranged hierarchically. Angular provides the Router service to help you define navigation paths among views. The router provides sophisticated in-browser navigational capabilities.
Modules
Angular apps are modular and Angular has its own modularity system called NgModules. NgModules are containers for a cohesive block of code dedicated to an application domain, a workflow, or a closely related set of capabilities. They can contain components, service providers, and other code files whose scope is defined by the containing NgModule. They can import functionality that is exported from other NgModules, and export selected functionality for use by other NgModules.
Every Angular app has at least one NgModule class, the root module, which is conventionally named AppModule and resides in a file named app.module.ts. You launch your app by bootstrapping the root NgModule.
While a small application might have only one NgModule, most apps have many more feature modules. The root NgModule for an app is so named because it can include child NgModules in a hierarchy of any depth.
NgModule metadata
An NgModule is defined by a class decorated with @NgModule(). The @NgModule() decorator is a function that takes a single metadata object, whose properties describe the module. The most important properties are as follows.
declarations: The components, directives, and pipes that belong to this NgModule.exports: The subset of declarations that should be visible and usable in the component templates of other NgModules.imports: Other modules whose exported classes are needed by component templates declared in this NgModule.providers: Creators of services that this NgModule contributes to the global collection of services; they become accessible in all parts of the app. (You can also specify providers at the component level, which is often preferred.)bootstrap: The main application view, called the root component, which hosts all other app views. Only the root NgModule should set thebootstrapproperty.
Here’s a simple root NgModule definition.
src/app/app.module.ts
import { NgModule } from '@angular/core';
import { BrowserModule } from '@angular/platform-browser';
@NgModule({
  imports:      [ BrowserModule ],
  providers:    [ Logger ],
  declarations: [ AppComponent ],
  exports:      [ AppComponent ],
  bootstrap:    [ AppComponent ]
})
export class AppModule { }
AppComponent is included in the exports list here for illustration; it isn’t actually necessary in this example. A root NgModule has no reason to export anything because other modules don’t need to import the root NgModule.
NgModules and components
NgModules provide a compilation context for their components. A root NgModule always has a root component that is created during bootstrap, but any NgModule can include any number of additional components, which can be loaded through the router or created through the template. The components that belong to an NgModule share a compilation context.

A component and its template together define a view. A component can contain a view hierarchy, which allows you to define arbitrarily complex areas of the screen that can be created, modified, and destroyed as a unit. A view hierarchy can mix views defined in components that belong to different NgModules. This is often the case, especially for UI libraries.
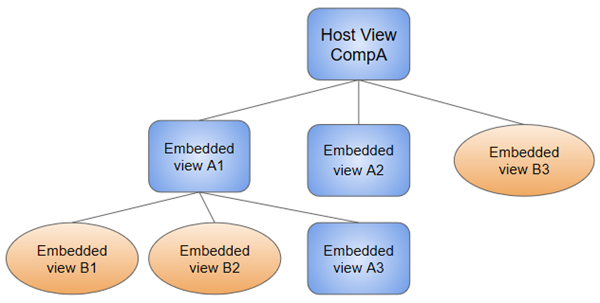
When you create a component, it’s associated directly with a single view, called the host view. The host view can be the root of a view hierarchy, which can contain embedded views, which are in turn the host views of other components. Those components can be in the same NgModule, or can be imported from other NgModules. Views in the tree can be nested to any depth.
Note: The hierarchical structure of views is a key factor in the way Angular detects and responds to changes in the DOM and app data.
NgModules and JavaScript modules
The NgModule system is different from and unrelated to the JavaScript (ES2015) module system for managing collections of JavaScript objects. These are complementary module systems that you can use together to write your apps.
In JavaScript each file is a module and all objects defined in the file belong to that module. The module declares some objects to be public by marking them with the export key word. Other JavaScript modules use import statements to access public objects from other modules.
import { NgModule } from '@angular/core'; import { AppComponent } from './app.component';
export class AppModule { }
Learn more about the JavaScript module system on the web.
Angular libraries

Angular loads as a collection of JavaScript modules. You can think of them as library modules. Each Angular library name begins with the @angular prefix. Install them with the node package manager npm and import parts of them with JavaScript import statements.
For example, import Angular’s Component decorator from the @angular/core library like this.
import { Component } from '@angular/core';You also import NgModules from Angular libraries using JavaScript import statements. For example, the following code imports the BrowserModule NgModule from the platform-browser library.
import { BrowserModule } from '@angular/platform-browser';In the example of the simple root module above, the application module needs material from within BrowserModule. To access that material, add it to the @NgModule metadata imports like this.
imports: [ BrowserModule ],In this way you’re using the Angular and JavaScript module systems together. Although it’s easy to confuse the two systems, which share the common vocabulary of “imports” and “exports”, you will become familiar with the different contexts in which they are used.
Learn more from the NgModules guide.
Components and templates
A component controls a patch of screen called a view. For example, individual components define and control each of the following views from the Tour of Heroes tutorial:
- The app root with the navigation links.
- The list of heroes.
- The hero editor.
You define a component’s application logic—what it does to support the view—inside a class. The class interacts with the view through an API of properties and methods.
For example, HeroListComponent has a heroes property that holds an array of heroes. Its selectHero() method sets a selectedHero property when the user clicks to choose a hero from that list. The component acquires the heroes from a service, which is a TypeScript parameter property on the constructor. The service is provided to the component through the dependency injection system.
src/app/hero-list.component.ts (class)`
export class HeroListComponent implements OnInit {
  heroes: Hero[];
  selectedHero: Hero;

  constructor(private service: HeroService) { }

  ngOnInit() {
    this.heroes = this.service.getHeroes();
  }

  selectHero(hero: Hero) { this.selectedHero = hero; }
}
Angular creates, updates, and destroys components as the user moves through the application. Your app can take action at each moment in this lifecycle through optional lifecycle hooks, like ngOnInit().
Component metadata

The @Component decorator identifies the class immediately below it as a component class, and specifies its metadata. In the example code below, you can see that HeroListComponent is just a class, with no special Angular notation or syntax at all. It’s not a component until you mark it as one with the @Component decorator.
The metadata for a component tells Angular where to get the major building blocks that it needs to create and present the component and its view. In particular, it associates a template with the component, either directly with inline code, or by reference. Together, the component and its template describe a view.
In addition to containing or pointing to the template, the @Component metadata configures, for example, how the component can be referenced in HTML and what services it requires.
Here’s an example of basic metadata for HeroListComponent.
src/app/hero-list.component.ts (metadata)
@Component({
  selector:    'app-hero-list',
  templateUrl: './hero-list.component.html',
  providers:  [ HeroService ]
})
export class HeroListComponent implements OnInit {
/* . . . */
}
This example shows some of the most useful @Component configuration options:
selector: A CSS selector that tells Angular to create and insert an instance of this component wherever it finds the corresponding tag in template HTML. For example, if an app’s HTML contains<app-hero-list></app-hero-list>, then Angular inserts an instance of theHeroListComponentview between those tags.templateUrl: The module-relative address of this component’s HTML template. Alternatively, you can provide the HTML template inline, as the value of thetemplateproperty. This template defines the component’s host view.providers: An array of providers for services that the component requires. In the example, this tells Angular how to provide theHeroServiceinstance that the component’s constructor uses to get the list of heroes to display.
Templates and views

You define a component’s view with its companion template. A template is a form of HTML that tells Angular how to render the component.
Views are typically arranged hierarchically, allowing you to modify or show and hide entire UI sections or pages as a unit. The template immediately associated with a component defines that component’s host view. The component can also define a view hierarchy, which contains embedded views, hosted by other components.

A view hierarchy can include views from components in the same NgModule, but it also can (and often does) include views from components that are defined in different NgModules.
Template syntax
A template looks like regular HTML, except that it also contains Angular template syntax, which alters the HTML based on your app’s logic and the state of app and DOM data. Your template can use data binding to coordinate the app and DOM data, pipes to transform data before it is displayed, and directives to apply app logic to what gets displayed.
For example, here is a template for the Tutorial’s HeroListComponent.
src/app/hero-list.component.html
<h2>Hero List</h2>

<p><i>Pick a hero from the list</i></p>
<ul>
  <li *ngFor="let hero of heroes" (click)="selectHero(hero)">
    {{hero.name}}
  </li>
</ul>

<app-hero-detail *ngIf="selectedHero" [hero]="selectedHero"></app-hero-detail>
This template uses typical HTML elements like <h2> and <p>, and also includes Angular template-syntax elements, *ngFor, {{hero.name}}, (click), [hero], and <app-hero-detail>. The template-syntax elements tell Angular how to render the HTML to the screen, using program logic and data.
- The
*ngFordirective tells Angular to iterate over a list. {{hero.name}},(click), and[hero]bind program data to and from the DOM, responding to user input. See more about data binding below.- The
<app-hero-detail>tag in the example is an element that represents a new component,HeroDetailComponent.HeroDetailComponent(code not shown) defines the hero-detail child view ofHeroListComponent. Notice how custom components like this mix seamlessly with native HTML in the same layouts.
Data binding
Without a framework, you would be responsible for pushing data values into the HTML controls and turning user responses into actions and value updates. Writing such push and pull logic by hand is tedious, error-prone, and a nightmare to read, as any experienced front-end JavaScript programmer can attest.
Angular supports two-way data binding, a mechanism for coordinating the parts of a template with the parts of a component. Add binding markup to the template HTML to tell Angular how to connect both sides.
The following diagram shows the four forms of data binding markup. Each form has a direction: to the DOM, from the DOM, or both.

This example from the HeroListComponent template uses three of these forms.
src/app/hero-list.component.html (binding)
<li>{{hero.name}}</li>
<app-hero-detail [hero]="selectedHero"></app-hero-detail>
<li (click)="selectHero(hero)"></li>- The
{{hero.name}}interpolation displays the component’shero.nameproperty value within the<li>element. - The
[hero]property binding passes the value ofselectedHerofrom the parentHeroListComponentto theheroproperty of the childHeroDetailComponent. - The
(click)event binding calls the component’sselectHeromethod when the user clicks a hero’s name.
Two-way data binding (used mainly in template-driven forms) combines property and event binding in a single notation. Here’s an example from the HeroDetailComponent template that uses two-way data binding with the ngModel directive.
src/app/hero-detail.component.html (ngModel) <input [(ngModel)]=”hero.name”>`
In two-way binding, a data property value flows to the input box from the component as with property binding. The user’s changes also flow back to the component, resetting the property to the latest value, as with event binding.
Angular processes all data bindings once for each JavaScript event cycle, from the root of the application component tree through all child components.

Data binding plays an important role in communication between a template and its component, and is also important for communication between parent and child components.

Pipes
Angular pipes let you declare display-value transformations in your template HTML. A class with the @Pipe decorator defines a function that transforms input values to output values for display in a view.
Angular defines various pipes, such as the date pipe and currency pipe; for a complete list, see the Pipes API list. You can also define new pipes.
To specify a value transformation in an HTML template, use the pipe operator (|).
{{interpolated_value | pipe_name}}You can chain pipes, sending the output of one pipe function to be transformed by another pipe function. A pipe can also take arguments that control how it performs its transformation. For example, you can pass the desired format to the date pipe.
<!-- Default format: output 'Jun 15, 2015'-->
 <p>Today is {{today | date}}</p>

<!-- fullDate format: output 'Monday, June 15, 2015'-->
<p>The date is {{today | date:'fullDate'}}</p>

 <!-- shortTime format: output '9:43 AM'-->
 <p>The time is {{today | date:'shortTime'}}</p>
Directives

Angular templates are dynamic. When Angular renders them, it transforms the DOM according to the instructions given by directives. A directive is a class with a @Directive() decorator.
A component is technically a directive. However, components are so distinctive and central to Angular applications that Angular defines the @Component() decorator, which extends the @Directive() decorator with template-oriented features.
In addition to components, there are two other kinds of directives: structural and attribute. Angular defines a number of directives of both kinds, and you can define your own using the @Directive() decorator.
Just as for components, the metadata for a directive associates the decorated class with a selector element that you use to insert it into HTML. In templates, directives typically appear within an element tag as attributes, either by name or as the target of an assignment or a binding.
Structural directives
Structural directives alter layout by adding, removing, and replacing elements in the DOM. The example template uses two built-in structural directives to add application logic to how the view is rendered.
src/app/hero-list.component.html (structural)
<li *ngFor="let hero of heroes"></li>
<app-hero-detail *ngIf="selectedHero"></app-hero-detail>*ngForis an iterative; it tells Angular to stamp out one<li>per hero in theheroeslist.*ngIfis a conditional; it includes theHeroDetailcomponent only if a selected hero exists.
Attribute directives
Attribute directives alter the appearance or behavior of an existing element. In templates they look like regular HTML attributes, hence the name.
The ngModel directive, which implements two-way data binding, is an example of an attribute directive. ngModel modifies the behavior of an existing element (typically <input>) by setting its display value property and responding to change events.
src/app/hero-detail.component.html (ngModel) <input [(ngModel)]=”hero.name”>`
Angular has more pre-defined directives that either alter the layout structure (for example, ngSwitch) or modify aspects of DOM elements and components (for example, ngStyle and ngClass).
Learn more in the Attribute Directives and Structural Directives guides.
Services and dependency injection
Service is a broad category encompassing any value, function, or feature that an app needs. A service is typically a class with a narrow, well-defined purpose. It should do something specific and do it well.
Angular distinguishes components from services to increase modularity and reusability. By separating a component’s view-related functionality from other kinds of processing, you can make your component classes lean and efficient.
Ideally, a component’s job is to enable the user experience and nothing more. A component should present properties and methods for data binding, in order to mediate between the view (rendered by the template) and the application logic (which often includes some notion of a model).
A component can delegate certain tasks to services, such as fetching data from the server, validating user input, or logging directly to the console. By defining such processing tasks in an injectable service class, you make those tasks available to any component. You can also make your app more adaptable by injecting different providers of the same kind of service, as appropriate in different circumstances.
Angular doesn’t enforce these principles. Angular does help you follow these principles by making it easy to factor your application logic into services and make those services available to components through dependency injection.
Service examples
Here’s an example of a service class that logs to the browser console.
src/app/logger.service.ts (class)
export class Logger {
  log(msg: any)   { console.log(msg); }
  error(msg: any) { console.error(msg); }
  warn(msg: any)  { console.warn(msg); }
}
Services can depend on other services. For example, here’s a HeroService that depends on the Logger service, and also uses BackendService to get heroes. That service in turn might depend on the HttpClient service to fetch heroes asynchronously from a server.
src/app/hero.service.ts (class)
export class HeroService {
  private heroes: Hero[] = [];

  constructor(
    private backend: BackendService,
    private logger: Logger) { }

  getHeroes() {
    this.backend.getAll(Hero).then( (heroes: Hero[]) => {
      this.logger.log(`Fetched ${heroes.length} heroes.`);
      this.heroes.push(...heroes); // fill cache
    });
    return this.heroes;
  }
}
Dependency injection (DI)

DI is wired into the Angular framework and used everywhere to provide new components with the services or other things they need. Components consume services; that is, you can inject a service into a component, giving the component access to that service class.
To define a class as a service in Angular, use the @Injectable() decorator to provide the metadata that allows Angular to inject it into a component as a dependency. Similarly, use the @Injectable() decorator to indicate that a component or other class (such as another service, a pipe, or an NgModule) has a dependency.
- The injector is the main mechanism. Angular creates an application-wide injector for you during the bootstrap process, and additional injectors as needed. You don’t have to create injectors.
- An injector creates dependencies, and maintains a container of dependency instances that it reuses if possible.
- A provider is an object that tells an injector how to obtain or create a dependency.
For any dependency that you need in your app, you must register a provider with the app’s injector, so that the injector can use the provider to create new instances. For a service, the provider is typically the service class itself.
A dependency doesn’t have to be a service—it could be a function, for example, or a value.
When Angular creates a new instance of a component class, it determines which services or other dependencies that component needs by looking at the constructor parameter types. For example, the constructor of HeroListComponent needs HeroService.
src/app/hero-list.component.ts (constructor)
constructor(private service: HeroService) { }When Angular discovers that a component depends on a service, it first checks if the injector has any existing instances of that service. If a requested service instance doesn’t yet exist, the injector makes one using the registered provider, and adds it to the injector before returning the service to Angular.
When all requested services have been resolved and returned, Angular can call the component’s constructor with those services as arguments.
The process of HeroService injection looks something like this.

Providing services
You must register at least one provider of any service you are going to use. The provider can be part of the service’s own metadata, making that service available everywhere, or you can register providers with specific modules or components. You register providers in the metadata of the service (in the @Injectable() decorator), or in the @NgModule() or @Component() metadata
By default, the Angular CLI command
ng generate serviceregisters a provider with the root injector for your service by including provider metadata in the@Injectable()decorator. The tutorial uses this method to register the provider of HeroService class definition.@Injectable({ providedIn: 'root', })When you provide the service at the root level, Angular creates a single, shared instance of
HeroServiceand injects it into any class that asks for it. Registering the provider in the@Injectable()metadata also allows Angular to optimize an app by removing the service from the compiled app if it isn’t used.When you register a provider with a specific NgModule, the same instance of a service is available to all components in that NgModule. To register at this level, use the
providersproperty of the@NgModule()decorator,@NgModule({ providers: [ BackendService, Logger ], ... })When you register a provider at the component level, you get a new instance of the service with each new instance of that component. At the component level, register a service provider in the
providersproperty of the@Component()metadata.src/app/hero-list.component.ts (component providers)
@Component({
  selector:    'app-hero-list',
  templateUrl: './hero-list.component.html',
  providers:  [ HeroService ]
})
Routing
The Angular Router NgModule provides a service that lets you define a navigation path among the different application states and view hierarchies in your app. It is modeled on the familiar browser navigation conventions:
- Enter a URL in the address bar and the browser navigates to a corresponding page.
- Click links on the page and the browser navigates to a new page.
- Click the browser’s back and forward buttons and the browser navigates backward and forward through the history of pages you’ve seen.
The router maps URL-like paths to views instead of pages. When a user performs an action, such as clicking a link, that would load a new page in the browser, the router intercepts the browser’s behavior, and shows or hides view hierarchies.
If the router determines that the current application state requires particular functionality, and the module that defines it hasn’t been loaded, the router can lazy-load the module on demand.
The router interprets a link URL according to your app’s view navigation rules and data state. You can navigate to new views when the user clicks a button or selects from a drop box, or in response to some other stimulus from any source. The router logs activity in the browser’s history, so the back and forward buttons work as well.
To define navigation rules, you associate navigation paths with your components. A path uses a URL-like syntax that integrates your program data, in much the same way that template syntax integrates your views with your program data. You can then apply program logic to choose which views to show or to hide, in response to user input and your own access rules.
- Post link: http://wangzt568.github.io/2020/08/17/Angular-Start/
- Copyright Notice: All articles in this blog are licensed under unless otherwise stated.
若没有本文 Issue,您可以使用 Comment 模版新建。
GitHub Issues